


一、前言
这两天心血来潮给自己的hexo网站换了主题,从sakura到butterfly了,
- 原sakura主题全部内容放到:http://cungudafa.gitee.io
(ps.sakura主题后面作者好像又有更新,我就不更新啦~) - 现目前主题butterfly:http://cungudafa.top
简单说一下butterfly的优点:
- 界面是我的新宠了
- 很多设置优化都单独封装在yml配置了(配置很方便,加载很nice,主题更新也方便)
- 友链单独封装yml文件,不用写index.md了
- 不蒜子统计(这些都是sakura没有完善的,我很心水。)
- tags页面
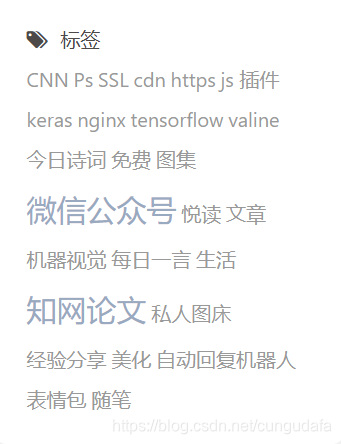
之前我在sakura也是仿这个写的,太卑微了吧。
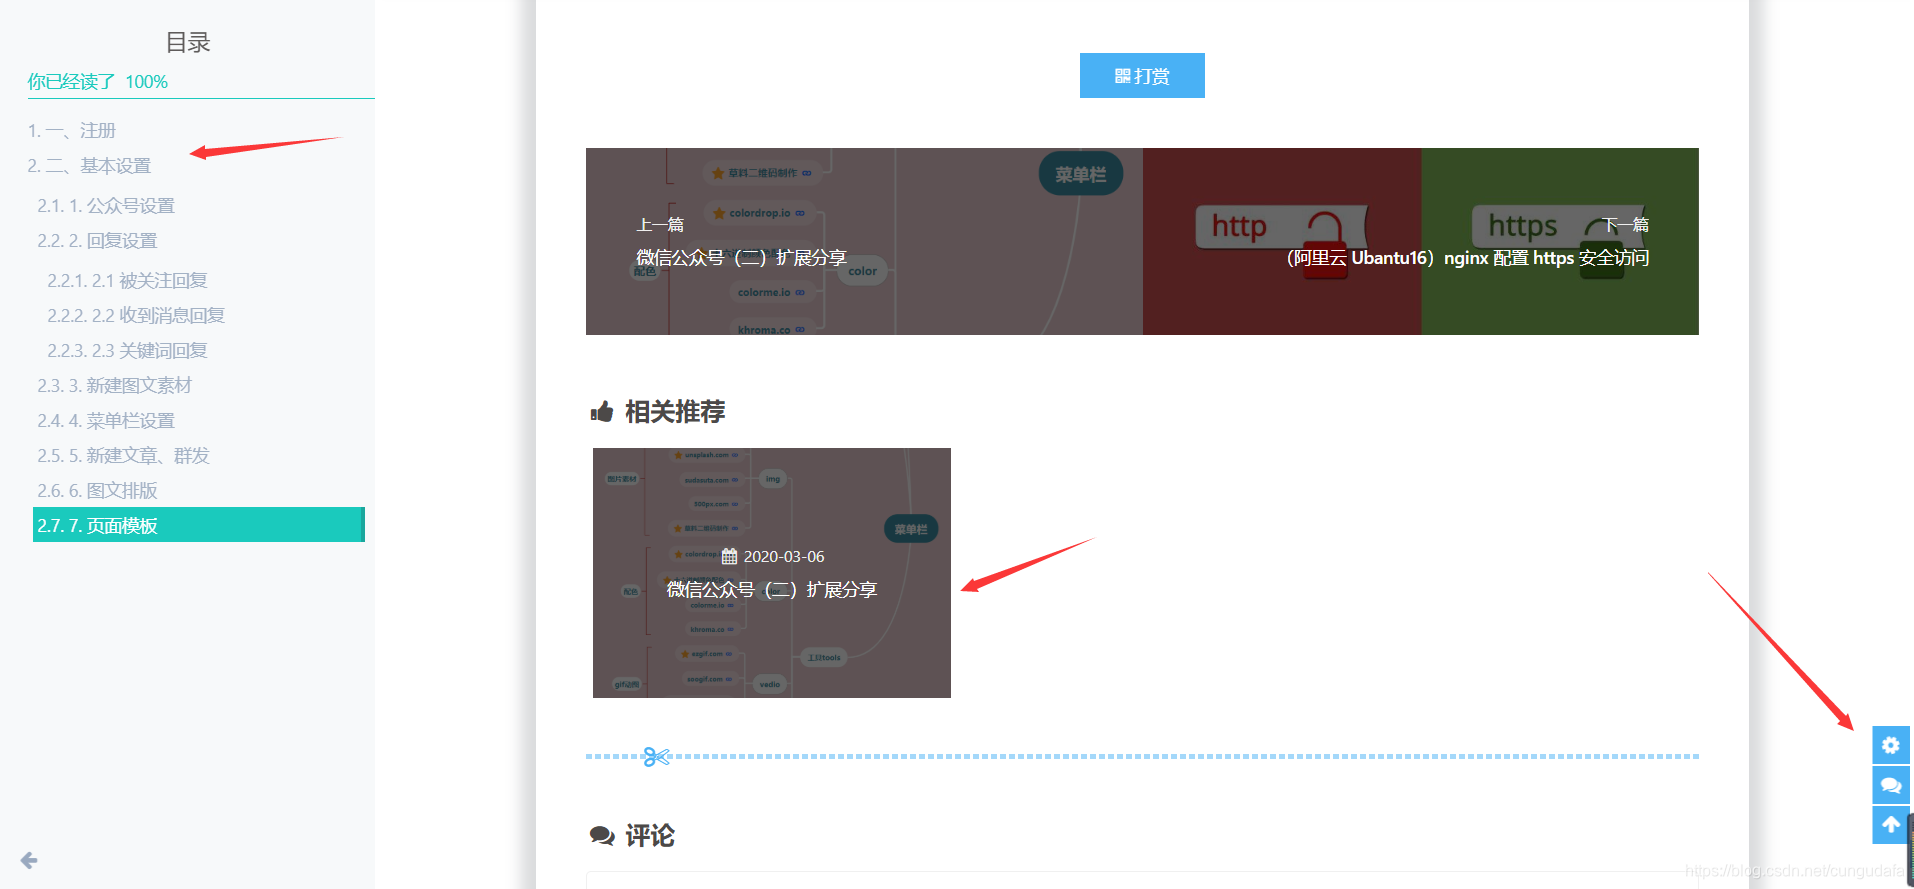
- 动态目录响应和相关文章推荐(这个可以设置插件,心动)
- 大招在支持黑夜模式和繁简体字转换
- 友链
和sakura出入不大,参考优化了一下也是美丽许多!(优化步骤见后文)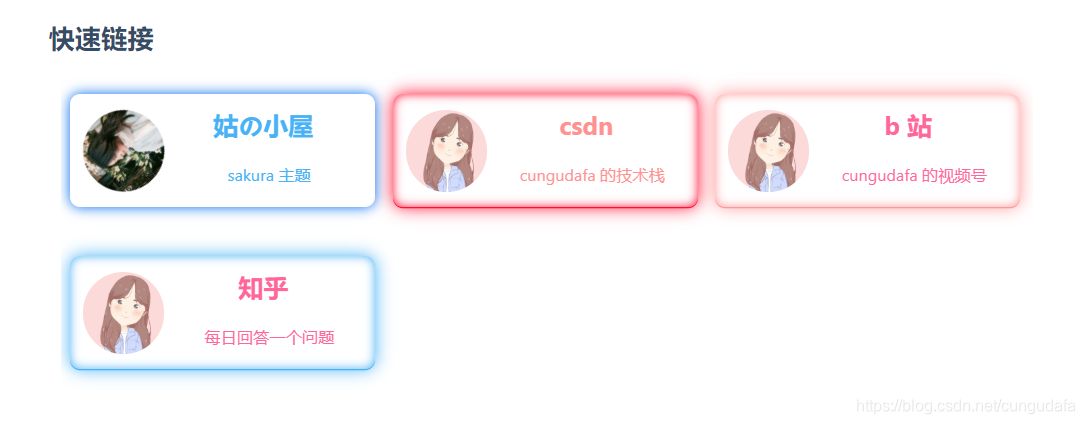
- 相册页面 (可)
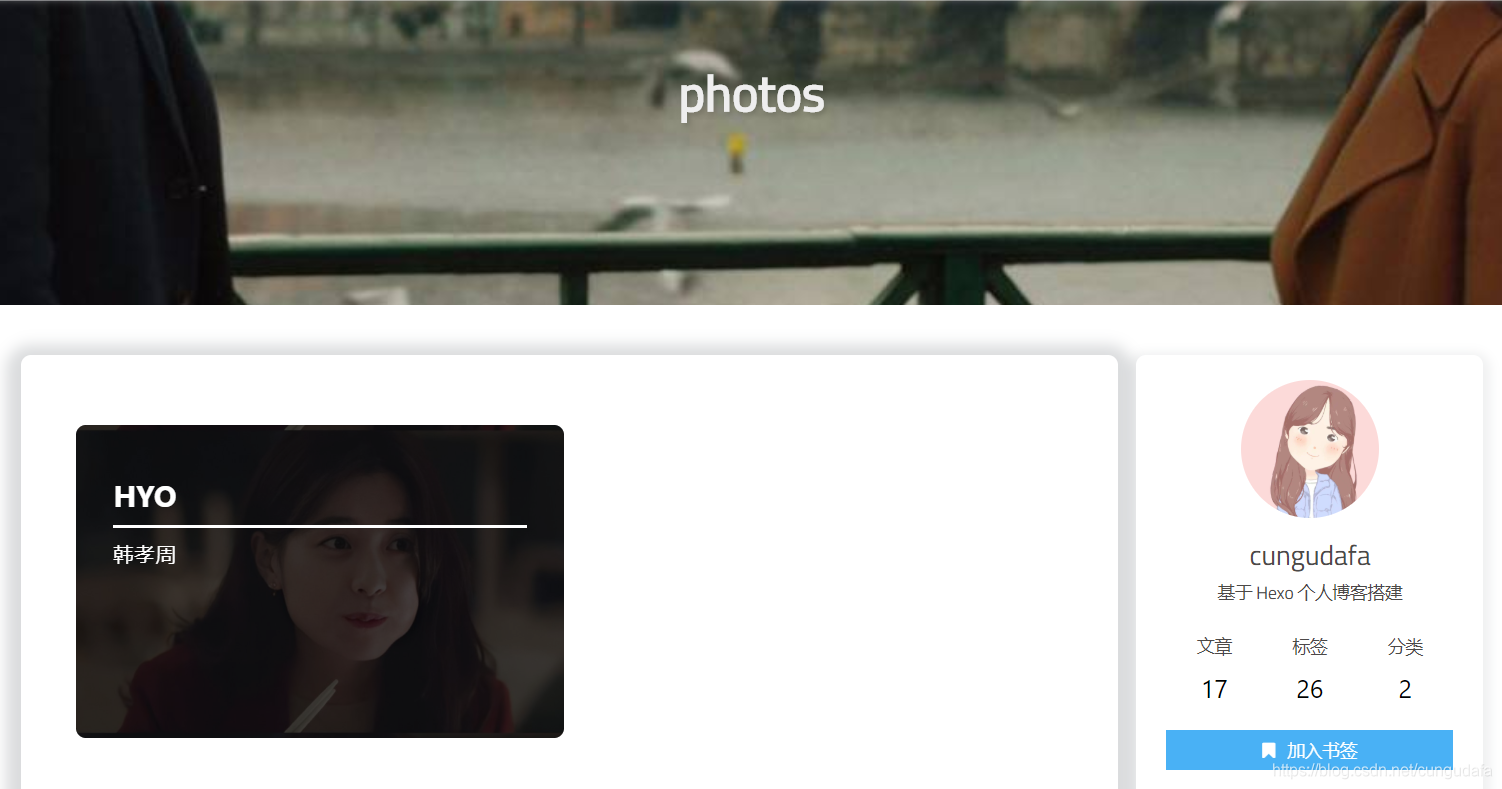
内部的图片展示效果我还在优化中,想自定义css。二、蝴蝶主题
1.快速入门
首先,非常感谢主题作者:JerryC 大佬,使用教程可以参考文档,当然如果遇到什么问题,也可以留言,我也尽最大努力帮助大家优化自己的网站。
主页:
如何开始你的hexo-theme-butterfly呢?
官方教程:快速开始
1. 第一次使用,一定要仔细阅读参考文档,配置好你的config和source。
2.其次,还有很多功能是需要安装插件的,申请app_id的都要按照规范做。
3.最后,注意细节是否有空格,名称路径是否出错。Hexo+Butterfly+Github+Coding搭建个人博客
这篇文章指出需要安装:npm install cheerio --save你是否安装可以查看根目录下的
package.json,参考我的:{ "name": "hexo-site", "version": "0.0.0", "private": true, "scripts": { "build": "hexo generate", "clean": "hexo clean", "deploy": "hexo deploy", "server": "hexo server" }, "hexo": { "version": "4.2.0" }, "dependencies": { "cheerio": "^1.0.0-rc.3", "hexo": "^4.0.0", "hexo-abbrlink": "^2.0.5", "hexo-algolia": "^1.3.1", "hexo-blog-encrypt": "^3.0.12", "hexo-deployer-git": "^2.1.0", "hexo-generator-archive": "^1.0.0", "hexo-generator-baidu-sitemap": "^0.1.6", "hexo-generator-category": "^1.0.0", "hexo-generator-feed": "^2.2.0", "hexo-generator-index-pin-top": "^0.2.2", "hexo-generator-json-content": "^4.1.6", "hexo-generator-searchdb": "^1.3.0", "hexo-generator-sitemap": "^2.0.0", "hexo-generator-tag": "^1.0.0", "hexo-neat": "^1.0.4", "hexo-permalink-pinyin": "^1.1.0", "hexo-related-popular-posts": "^4.0.0", "hexo-renderer-ejs": "^1.0.0", "hexo-renderer-marked": "^2.0.0", "hexo-renderer-pug": "^1.0.0", "hexo-renderer-stylus": "^1.1.0", "hexo-server": "^1.0.0", "hexo-tag-bili": "^1.0.0", "hexo-tag-fancybox_img": "^1.0.1", "hexo-wordcount": "^6.0.1" } }2.valine评论移植
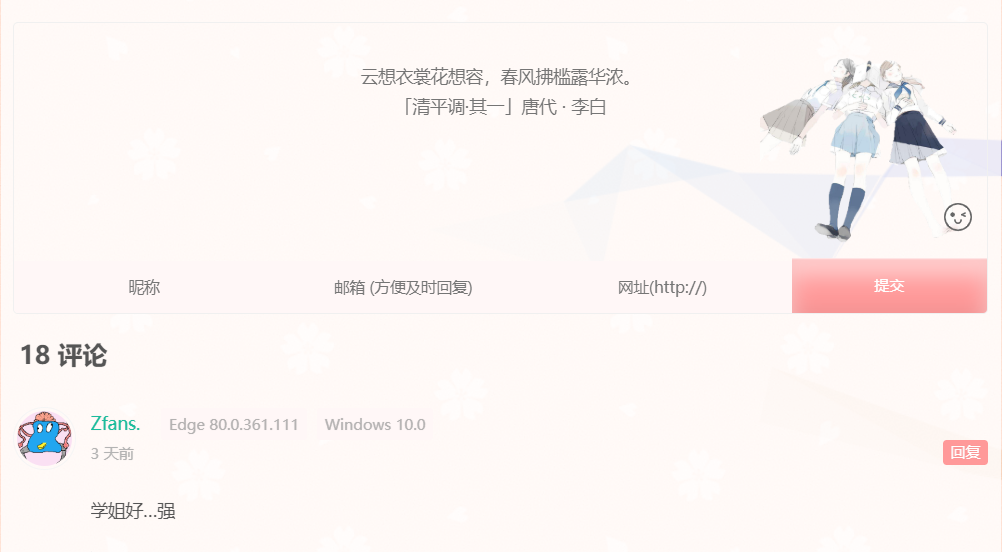
如果你之前有过主题,可不可以把评论也搬过来呢?
当然是可以的!
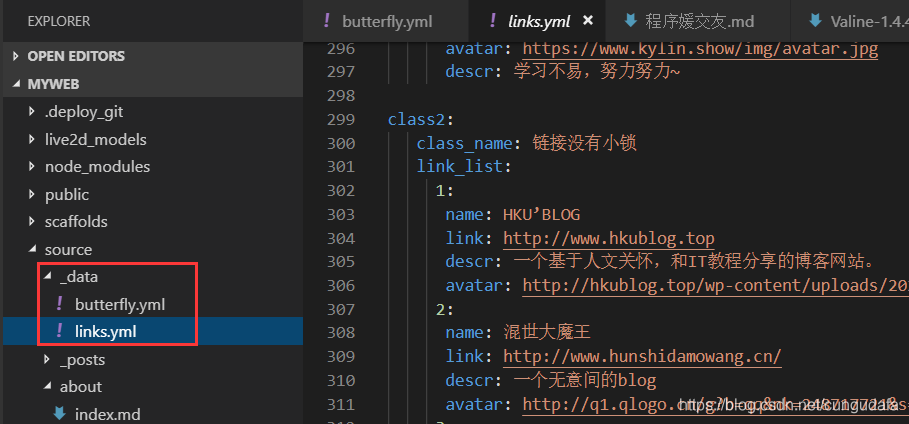
- 注意把
yml配置的链接路径对应上(这是访问路径)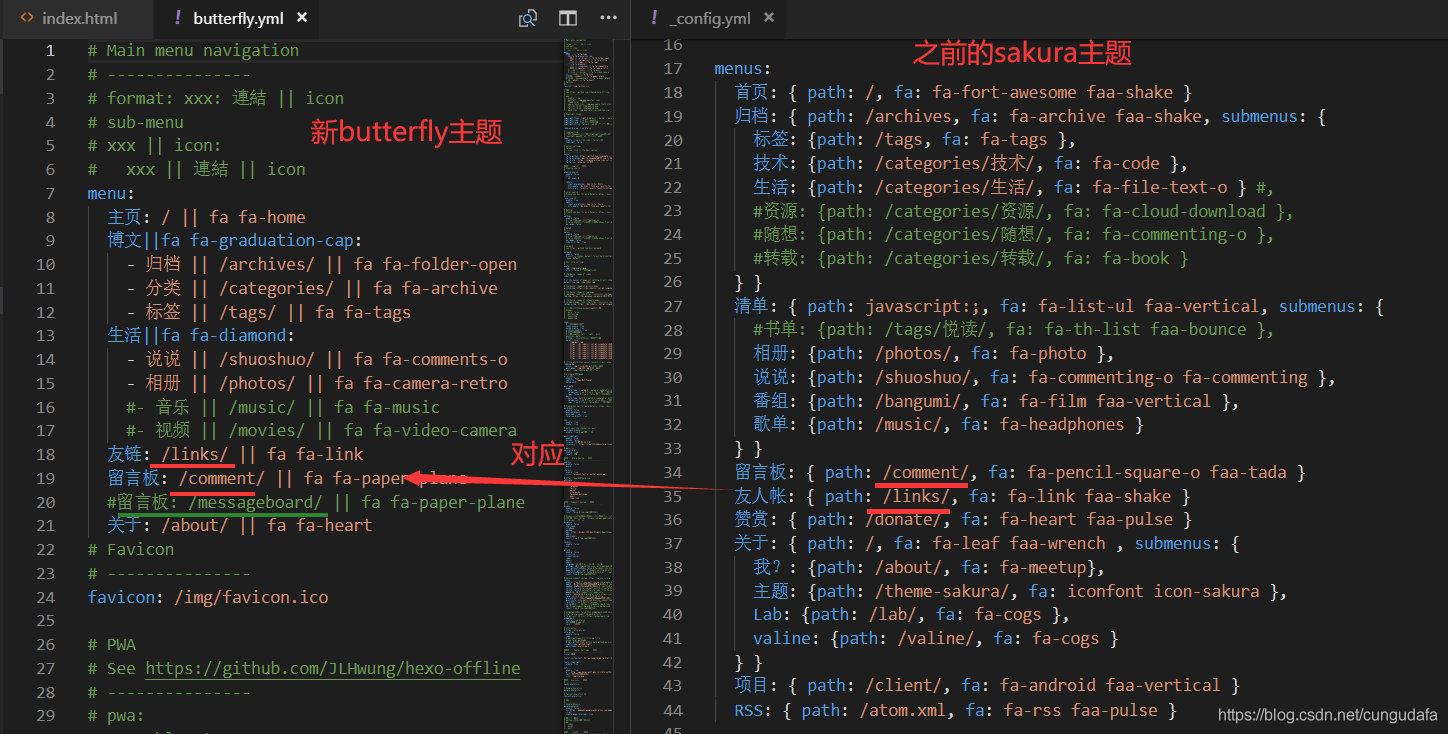
因为在leancloud存储里是域名和链接页面的路径,只要路径一样就可以显示之前主题的留言啦!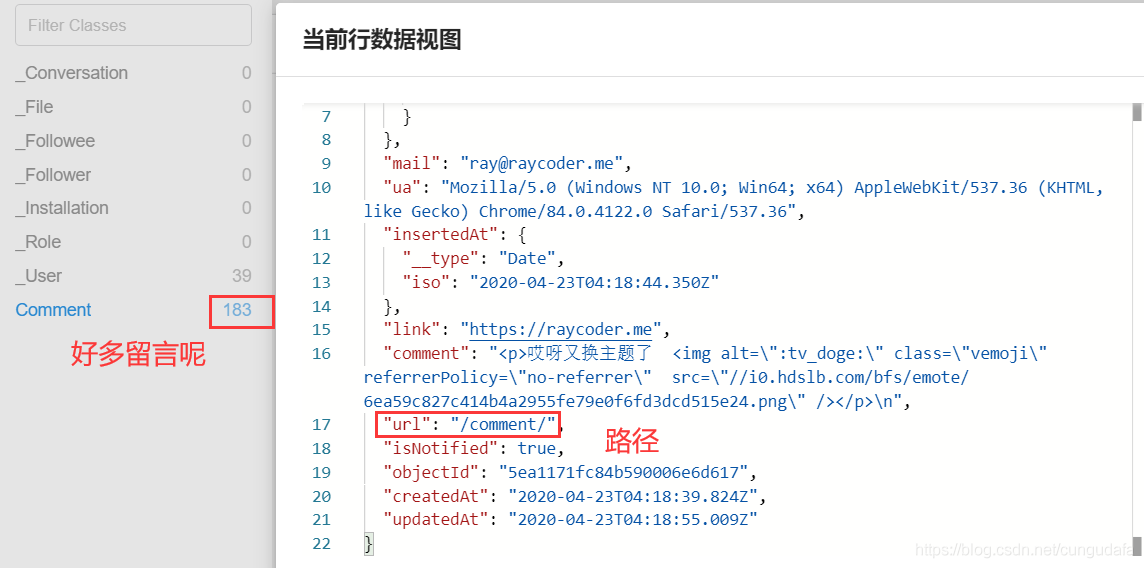
leancloud显示是从域名拼接路径,就像这样,(这样设置的确可以在两个域名都显示同一组评论,不过valine-admin(zhaojun版)返回邮件的地址只有一个哦!最好还是再建立一个leancloud后台容器!)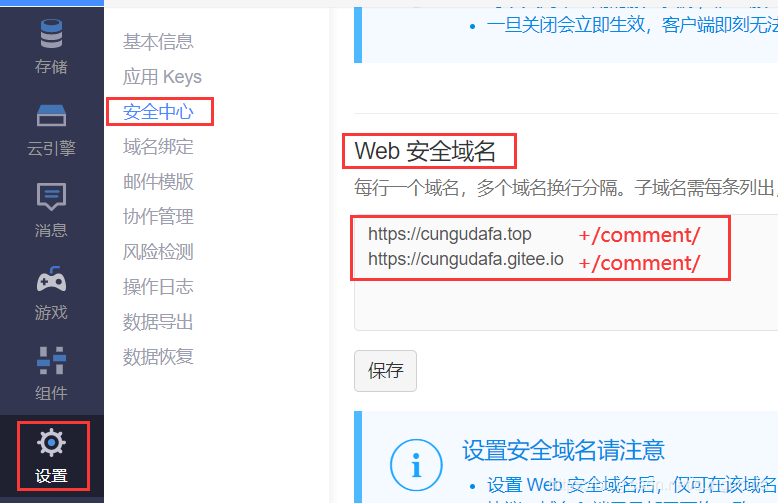
- 在页面中,渲染样式是根据主题来设置的!!!(注意
links\index.md的type是link)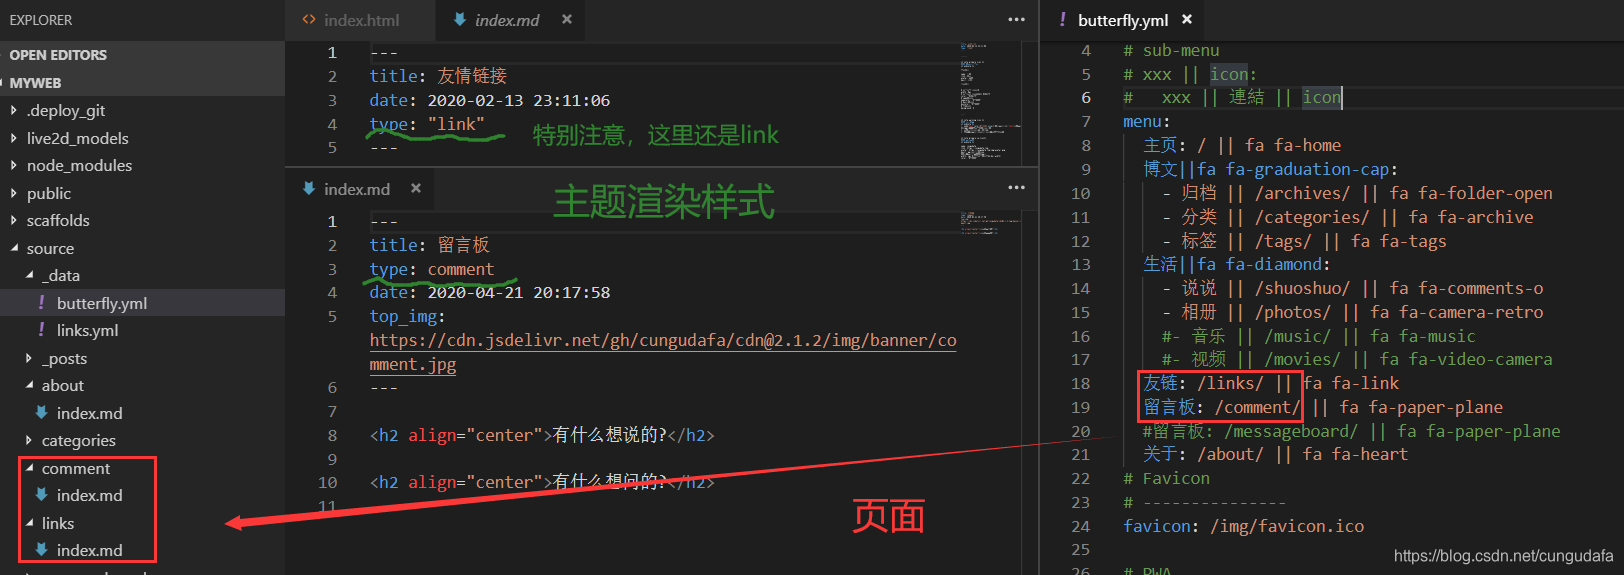
解释一下:type: link是从全局渲染data\link.yml友链内容到links\index.md中
- 这里需要把link.yml改为
links.yml
即这个内容文件时\links\index.html页面所用 - 同时修改flink.pug引用link.yml为
links.yml(即:site.data.link改为site.data.links) 总结:valine评论移植,只要相对路径搞好,就可。
3.文章移植
我以前设置的是hexo-abbrlink插件——随机访问路径,这里在主配置文件下不用修改,
但是,在文章里注意这个abbrlink的地址也要写过来哦!
sakura到butterfly的区别是(作者信息没有了,首图top_img还有cover封面的覆盖图,根据之前的教程设置吧——主题页面。)
---
abbrlink: '44e8'
title: 微信公众号(二)扩展分享
tags:
  - 微信公众号
categories: 技术
comment: true
description: 'cungudafa:在学习中的小王呀'
top_img: https://img-blog.csdnimg.cn/20200306151717593.png
cover: https://img-blog.csdnimg.cn/20200306151717593.png
date: 2020-03-06 16:54:10
---
同理,文章的相对路径没变的话,以前的评论也可以拉取过来哦!
三、个性美化
以下页面需要在目录显示,请设置butterfly.yml
如果需要中英文设置,请在主题themes\Butterfly\languages 设置。
menu:
  主页: / || fa fa-home
  博文||fa fa-graduation-cap:
    - 归档 || /archives/ || fa fa-folder-open
    - 分类 || /categories/ || fa fa-archive
    - 标签 || /tags/ || fa fa-tags
  生活||fa fa-diamond:
    - 说说 || /shuoshuo/ || fa fa-comments-o
    - 相册 || /photos/ || fa fa-camera-retro
    #- 音乐 || /music/ || fa fa-music
    #- 视频 || /movies/ || fa fa-video-camera
  友链: /links/ || fa fa-link
  留言板: /comment/ || fa fa-paper-plane
  #留言板: /messageboard/ || fa fa-paper-plane
  关于: /about/ || fa fa-heart
1.boyui对话框式简介页面

- css和官网一致。
- 你可以下载我的botui.js,然后修改后文(你想要显示的)内容即可。
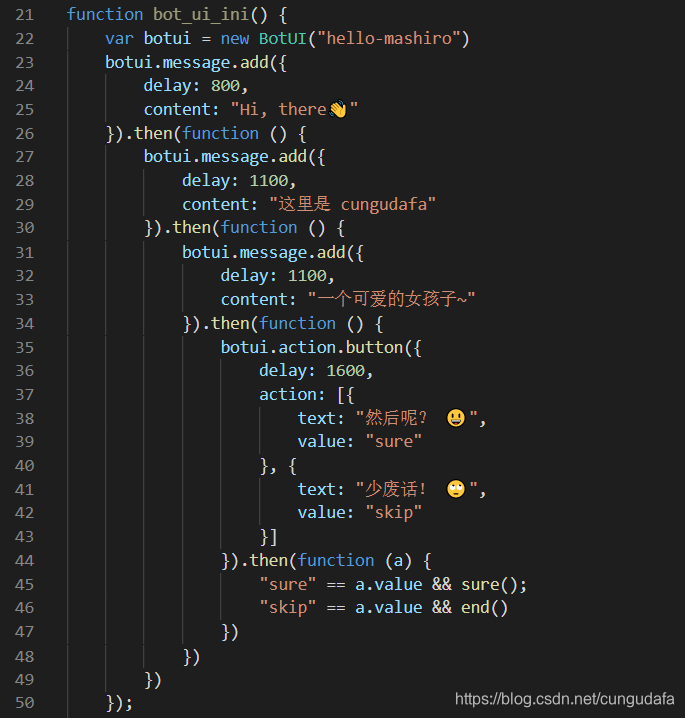
- 修改你要显示的页面,加上css和js引用,标签是:
<bot-ui></botui>source\about\index.md
我这个外框直接从sakura移植过来的,具体也贴出来了,方便copy!
title: about
date: 2020-2-12 22:14:36
keywords: 关于
description:
comments: false
img: https://cdn.jsdelivr.net/gh/cungudafa/cdn/img/banner/about.jpg
{% raw %}
与 cungudafa 对话中...
## 2.说说动态页面
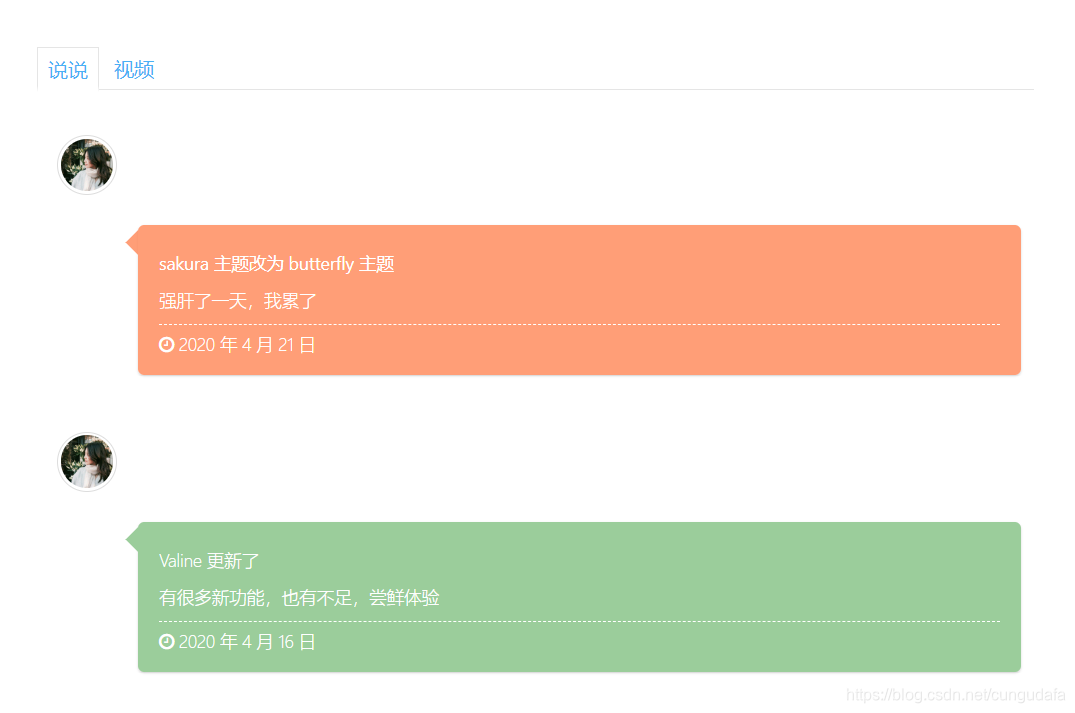
这个功能我也是从我之前的 [sakura主题](https://blog.csdn.net/cungudafa/article/details/104503242) 搬过来的[静态的样式css](https://gitee.com/cungudafa/source/raw/master/css/shuoshuo.css),稍加修改。
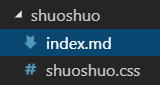
`source\shuoshuo\index.md`
```bash
---
title: shuoshuo
type: shuoshuo
noDate: 'true'
comments: 'false'
top_img: https://cdn.jsdelivr.net/gh/cungudafa/img/images/food.jpg
---
<link rel="stylesheet" href="https://gitee.com/cungudafa/source/raw/master/css/shuoshuo.css">
<p></p>
<div class="photos-btn-wrap">
<!-- <a class="photos-btn" href="http://cungudafa.top/photos/">Photos</a> -->
<a class="photos-btn active" href="">说说</a>
<a class="photos-btn" href="https://space.bilibili.com/430247358">视频</a>
</div>
<div id="primary" class="content-area" style="">
<main id="main" class="site-main" role="main">
<div id="shuoshuo_content">
<ul class="cbp_tmtimeline">
<li> <span class="shuoshuo_author_img"><img src="https://cdn.jsdelivr.net/gh/cungudafa/cdn/img/custom/cungudafa.jpg" class="avatar avatar-48" width="48" height="48"></span>
<div class="cbp_tmlabel" href="">
<p></p>
<p><strong>sakura主题改为butterfly主题</strong></p>
<p>强肝了一天,我累了<p>
<p></p>
<p class="shuoshuo_time"><i class="fa fa-clock-o"></i>
2020年4月21日
</p>
</div>
</li>
<li> <span class="shuoshuo_author_img"><img src="https://cdn.jsdelivr.net/gh/cungudafa/cdn/img/custom/cungudafa.jpg" class="avatar avatar-48" width="48" height="48"></span>
<div class="cbp_tmlabel" href="">
<p></p>
<p>第一个说说</p>
<p></p>
<p class="shuoshuo_time"><i class="fa fa-clock-o"></i>
2020年2月25日
</p>
</div>
</li>
</ul>
</div>
</div>针对静态说说不能在线发布的问题,Uncle_drew 研究的gtalk在线发布https://cndrew.cn/shuoshuo/,这是另一款评论后台,防止和valine评论冲突,用了两个后台。
3.友链页面优化
默认: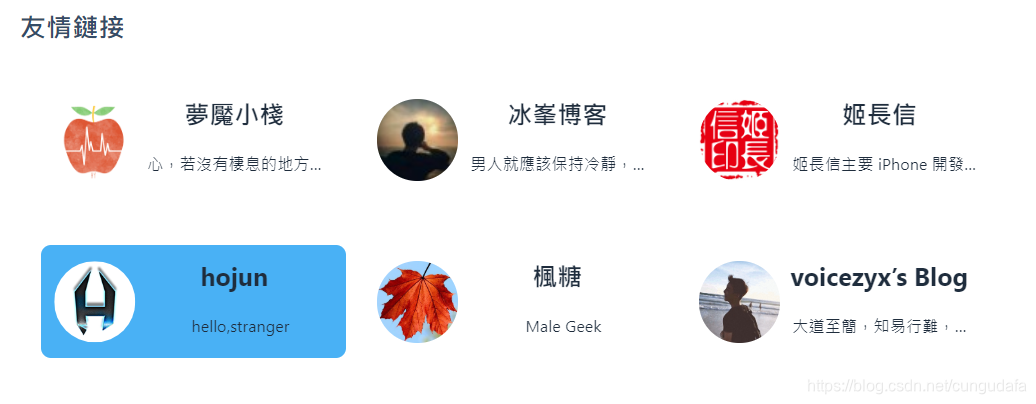
优化:
我直接将修改步骤再贴一遍,如果觉得好用,记得去上面链接的原博留言打卡,谢!
- 修改
themes\Butterfly\layout\flink.pug渲染样式
(ctrl+/注释掉原来的内容,将下面添加进去:)
#page
  .flink#article-container
    each i in site.data.links
      h2= i.class_name
      .post-cards
        .md-links
          each item in i.link_list
            .md-links-item(style= item.color ? `--primary-color:${item.color};border-width:${item.width};border-style:${item.style};animation: ${item.custom} ${item.time} infinite alternate; background:${item.background}` : 'border-width:0px;border-style:solid;animation: link_custom 0s infinite alternate;background:0')
              a.customcolor(href=item.link  title=item.name target="_blank" rel=item.remove ? "external nofollow" : "" style=item.namecolor ? `--namecolor:${item.namecolor}` : '')
                if theme.lazyload.enable
                  img.lazyload(data-src=item.avatar onerror=`this.onerror=null;this.src='` + url_for(theme.lodding_bg.flink) + `'` alt=item.name,style=item.rotate ? `--primary-rotate:${item.rotate};--autotime:${item.autotime};` : '--primary-rotate:0deg' class=item.autorotate ? `${item.autorotate}` : '')
                else
                  img(src=item.avatar onerror=`this.onerror=null;this.src='` + url_for(theme.lodding_bg.flink) + `'` alt=item.name )
                .md-links-title= item.name
                .md-links-des= item.descr
    != page.content
  if page.comments !== false
    include includes/comments/index.pug
添加css样式,外链
(ctrl+F全局搜索 css: ,并添加外链 )- https://cdn.jsdelivr.net/gh/sviptzk/HexoStaticFile@master/Hexo/css/flink.min.css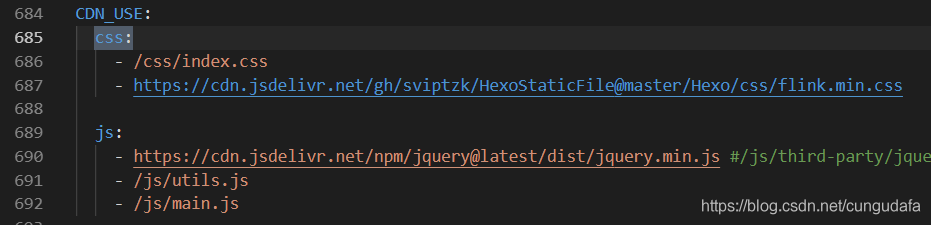
使用方法:
在link.yml里写:
      name: 姓名
      link: 地址
      avatar: 头像
      descr: 描述
      # 边框大小 默认为0
      width: 0px
      # 边框样式 默认 solid
      style: solid
      # 边框颜色 默认淡蓝色 #49b1f5
      color: "#49b1f5"
      # 自动旋转 可选值 flash(闪现) link_custom(单色呼吸灯) link_custom1(彩色呼吸灯)
      custom: link_custom
      # 动画时长设定,默认为0
      time: 4s
      # name的颜色
      namecolor: "#ff6699"
      # descr的颜色
      descolor: "#ff6699"
      # 背景颜色
      background: 0
      # 鼠标悬停旋转角度
      rotate: 360deg
      # 自动旋转 latuo左旋转 rauto右旋转
      autorotate: "lauto"
      # 旋转的周期(时长)
      autotime: 0s
      #移除此链接的权重 0为否 非0为移除
      remove: 0
篇幅蛮大的了,作为一次换主题的笔记吧,方便我以后查看,嘿嘿~
欢迎大家多多指教!
如果这篇文章不见了,那去csdn看看,https://blog.csdn.net/cungudafa/article/details/105699384